Locally publishing a VS2010 ASP.NET web application using MSBuild
November 04, 2010 3:13 AM by Daniel Chambers
Visual Studio 2010 has great new Web Application Project publishing features that allow you to easy publish your web app project with a click of a button. Behind the scenes the Web.config transformation and package building is done by a massive MSBuild script that’s imported into your project file (found at: C:\Program Files (x86)\MSBuild\Microsoft\VisualStudio\v10.0\Web\Microsoft.Web.Publishing.targets). Unfortunately, the script is hugely complicated, messy and undocumented (other then some oft-badly spelled and mostly useless comments in the file). A big flowchart of that file and some documentation about how to hook into it would be nice, but seems to be sadly lacking (or at least I can’t find it).
Unfortunately, this means performing publishing via the command line is much more opaque than it needs to be. I was surprised by the lack of documentation in this area, because these days many shops use a continuous integration server and some even do automated deployment (which the VS2010 publishing features could help a lot with), so I would have thought that enabling this (easily!) would be have been a fairly main requirement for the feature.
Anyway, after digging through the Microsoft.Web.Publishing.targets file for hours and banging my head against the trial and error wall, I’ve managed to figure out how Visual Studio seems to perform its magic one click “Publish to File System” and “Build Deployment Package” features. I’ll be getting into a bit of MSBuild scripting, so if you’re not familiar with MSBuild I suggest you check out this crash course MSDN page.
Publish to File System

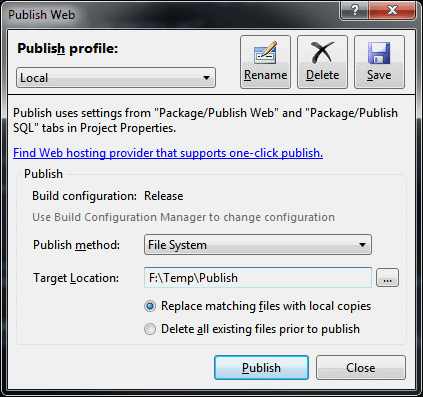
The VS2010 Publish To File System Dialog
Publish to File System took me a while to nut out because I expected some sensible use of MSBuild to be occurring. Instead, VS2010 does something quite weird: it calls on MSBuild to perform a sort of half-deploy that prepares the web app’s files in your project’s obj folder, then it seems to do a manual copy of those files (ie. outside of MSBuild) into your target publish folder. This is really whack behaviour because MSBuild is designed to copy files around (and other build-related things), so it’d make sense if the whole process was just one MSBuild target that VS2010 called on, not a target then a manual copy.
This means that doing this via MSBuild on the command-line isn’t as simple as invoking your project file with a particular target and setting some properties. You’ll need to do what VS2010 ought to have done: create a target yourself that performs the half-deploy then copies the results to the target folder. To edit your project file, right click on the project in VS2010 and click Unload Project, then right click again and click Edit. Scroll down until you find the Import element that imports the web application targets (Microsoft.WebApplication.targets; this file itself imports the Microsoft.Web.Publishing.targets file mentioned earlier). Underneath this line we’ll add our new target, called PublishToFileSystem:
<Target Name="PublishToFileSystem" DependsOnTargets="PipelinePreDeployCopyAllFilesToOneFolder">
    <Error Condition="'$(PublishDestination)'==''" Text="The PublishDestination property must be set to the intended publishing destination." />
    <MakeDir Condition="!Exists($(PublishDestination))" Directories="$(PublishDestination)" />

    <ItemGroup>
        <PublishFiles Include="$(_PackageTempDir)\**\*.*" />
    </ItemGroup>

    <Copy SourceFiles="@(PublishFiles)" DestinationFiles="@(PublishFiles->'$(PublishDestination)\%(RecursiveDir)%(Filename)%(Extension)')" SkipUnchangedFiles="True" />
</Target>
This target depends on the PipelinePreDeployCopyAllFilesToOneFolder target, which is what VS2010 calls before it does its manual copy. Some digging around in Microsoft.Web.Publishing.targets shows that calling this target causes the project files to be placed into the directory specified by the property _PackageTempDir.
The first task we call in our target is the Error task, upon which we’ve placed a condition that ensures that the task only happens if the PublishDestination property hasn’t been set. This will catch you and error out the build in case you’ve forgotten to specify the PublishDestination property. We then call the MakeDir task to create that PublishDestination directory if it doesn’t already exist.
We then define an Item called PublishFiles that represents all the files found under the _PackageTempDir folder. The Copy task is then called which copies all those files to the Publish Destination folder. The DestinationFiles attribute on the Copy element is a bit complex; it performs a transform of the items and converts their paths to new paths rooted at the PublishDestination folder (check out Well-Known Item Metadata to see what those %()s mean).
To call this target from the command-line we can now simply perform this command (obviously changing the project file name and properties to suit you):
msbuild Website.csproj "/p:Platform=AnyCPU;Configuration=Release;PublishDestination=F:\Temp\Publish" /t:PublishToFileSystem
Build Deployment Package

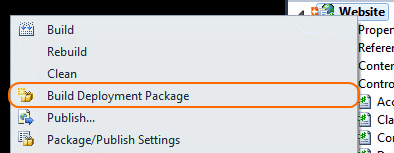
The VS2010 Build Deployment Package command
Thankfully, Build Deployment Package is a lot easier to do from the command line because Visual Studio doesn’t do any manual outside-of-MSBuild stuff; it simply calls an MSBuild target (as it should!). To do this from the command-line, you can simply call on MSBuild like this (again substituting your project file name and property values):
msbuild Website.csproj "/p:Platform=AnyCPU;Configuration=Release;DesktopBuildPackageLocation=F:\Temp\Publish\Website.zip" /t:Package
Note that you can omit the DesktopBuildPackageLocation property from the command line if you’ve already set it by setting something using the VS2010 Package/Publish Web project properties UI (setting the “Location where package will be created” textbox). If you omit it without customising the value in the VS project properties UI, the location will be defaulted to the project’s obj\YourCurrentConfigurationHere\Package folder.
Conclusion
In conclusion, we’ve seen how it’s fairly easy to configure your project file to support publishing your ASP.NET web application to a local file system directory using MSBuild from the command line, just like Visual Studio 2010 does (fairly easy once the hard investigative work is done!). We’ve also seen how you can use MSBuild at the command-line to build a deployment package. Using this new knowledge you can now open your project up to the world of automation, where you could, for example, get your continuous integration server to create deployable builds of your web application for you upon each commit to your source control repository.
Comments (13)
Submit Comment | Comments RSS Feed
Petkov
November 24, 2010 7:30 PM
Thanks! This is exact what I was looking for
This is what I am looking for however there has to be some target missing or property I need to set because I get the error
"The Target PipelinePreDeployCopyAllFilesToOneFolder does not exist in project."
You may have manually set the property or target in your MSBuild project file and not know it.
Right now I can't figure out what property(s) and or target(s) are needed to import the use of Microsoft.Web.Publishing.targets file.
I guess I'll go digging into the
Microsoft.WebApplication.targets to find it. EEK!
So I decided to try the Package solution and create a zip file. NO DICE as I get the error.
Package does not exist in the project.
Figured out my problem My project targets .NET 2.0 and this only works if you use .NET 4.0
Andrew Newcomb
December 13, 2010 1:55 PM
Thanks for a useful post, just what I needed.
I had to make one further change to stop the tokenisation of connection strings in the web.config file.
Search for AutoParameterizationWebConfigConnectionStrings in the post at...
http://sedodream.com/2010/11/11/ASPNETWebApplicationPublishPackageTokenizingParameters.aspx
woofy
August 22, 2011 3:02 PM
I created a test web app with VS2010 and this method worked perfectly. However, I tried it on our actual application and it fails with a bunch of errors.
To figure out what was wrong, I set up a new test scenario with my initial test web app by creating a new class library project and then referencing this project (not its DLL) by my web app (I also made sure to put some code in my web app that actually referenced code in the class library). When I tried your command line method, it failed with the same errors that I got when I tried this on our production app. I then removed the reference to the class library project and instead referenced its DLL directly. The build worked just fine after that.
How is one supposed to deal with this situation?
Unknown (google)
November 08, 2011 8:45 PM
Hi,
I encountered the following error when used the above publish to filesystem method
MSB3021 unable to copy because a file or directory with the same name already exists.
Any ideas?
superbDeveloper
December 20, 2011 10:55 AM
thanks works well
sproket99
April 09, 2012 8:59 AM
Great post. Thank you very much...
Magnus
April 17, 2012 4:53 PM
Been looking for this for a long time for our build server without finding any good solution. Thank you very much!
A complete article with screen shots to deploy asp.et web applications...
csharpdemos.blogspot.in/2012/08/how-to-deploy-aspnet-website-using-iis-7.html
Per
October 22, 2012 9:25 AM
Thanks for a great article. These features are surely badly documented and I have myself been looking around a lot for this kind of solution.
Stephan
May 06, 2013 3:07 PM
We are implementing a pluggable architecture at a client.
We have one ASP.NET MVC web core with N plugins created by separate teams (which go into the Areas folder of the core).
Each plugin is a separate ASP.NET MVC project and we should be able to deploy it.
We want the ability for a plugin team to deploy the plugin by creating a package.
The core should not be redeployed each time.
How would this have to be achieved (custom targets file)?
All content (views, scripts, css) must go into the Areas sub folder of the core.
The dll files must go into the bin folder of the core.
The goal is that an administrative person runs the package (eventually with some customizations).
