
Only showing posts in the "Software Development" category
ASP.NET MVC Compared to JSF
June 10, 2009 3:00 PM by Daniel Chambers
Updated on 2009/06/12 & 2009/06/13.
Today I'm going to do a little no-holds-barred comparison of ASP.NET MVC and JavaServer Faces (JSF) based on my impressions when working with the both of them. I worked with ASP.NET MVC in my Enterprise .NET university subject and with JSF in my Enterprise Java subject. Please note that this is in no way a scientific comparison of the two technologies and is simply my view of the matter based on my experiences.
ASP.NET MVC is the new extension to ASP.NET that allows you to write web pages using the Model View Controller pattern. Compared to the old ASP.NET Forms way of doing things, it's a breath of fresh air. JSF is one of the many Java-based web application frameworks that are available. It's basically an extension to JSP (JavaServer Pages), which is a page templating language similar to the way ASP.NET Forms works (except without the code-behind; so it's more like original ASP in that respect).
JSF Disadvantages
It is probably easiest if I start with what is wrong with JSF and what makes it a total pain in the arse to use (you can tell already which slant this post will take! :D)
Faces-Config.xml
In years past, the world went XML-crazy (this has lessened in recent years). Everybody was jumping aboard the XML train and putting everything they could into XML. The Faces-Config.xml is a result of this (in my opinion, anyway). It is basically one massive XML file where you define where every link on (almost) every page goes to. You also declare your "managed backing beans", which are just classes that the framework instantiates and manages the lifecycle (application, session, or per-request) of. In addition, you can declare extensions to JSF like custom validators, among other things.
All of this goes into the one XML file. As you can probably see, it soon becomes huge and unwieldy. Also, when working in a team, everybody is always editing this file and as such nasty merge conflicts often occur.
Page Navigation
In JSF, you need to define where all your links go in your faces-config.xml. You can do stuff like wildcards (which lets you describe where a link from any page goes) to help ease this pain, but it still sucks.
Not only that, but every page link in JSF is a POST->Redirect, GET->Response. Yes, that's right, every click is a form submit and redirect. Even from a normal page to the next. If you don't perform the redirect, JSF will still show you the next page, but it shows it under the previous page's URL (kind of like an ASP.NET Server.Transfer).
No Page Templating Support
It seems like a simple thing, but JSF just doesn't have any page templating support (called Master Pages in ASP.NET). This makes keeping a site layout consistent a real pain. We ended up resorting to using Dreamweaver Templates (basically just advanced copy & paste) to keep our site layout consistent. Yuck.
Awkward Communication Between Pages and Between Objects
In JSF, it is awkward and difficult to communicate data between pages. JSF doesn't really support URL query string parameters (since every link is a POST), so you end up having to create an object that sticks around for the user's session and then putting the data that you want on the next page in that, ready for the next page to get. Yuck. There are other approaches, but none of them are really very easy to do.
Communication between "managed backing beans" is awkward. You end up having to manually compile a JSP Expression Language statement to get at other backing beans. Check out this page to see all the awkward contortions you need to do to achieve anything.
ASP.NET MVC vs. JSF Disadvantages
So enough JSF bashing. It's all very well to beat on JSF, but can ASP.NET MVC do all those things that JSF can't do well? The answer is yes, yes it can.
Little XML Configuration
Other than the web.xml file, where you initialise a lot of ASP.NET MVC settings (like integration with IIS, Membership, Roles, Database connection strings, etc), ASP.NET MVC doesn't use any XML. The things that you do have to do in the web.xml are likely things you'll set up once and never touch again, and so are unlikely to cause messy merge conflicts in revision control. Even user authorisation for page access is not done in XML (unlike JSF, and for that matter, ASP.NET Forms); it's done with attributes in the code.
RESTful URLs and Page Navigation
ASP.NET MVC has a powerful URL routing engine that allows (and encourages) you to use RESTful URLs. When you create page links, ASP.NET MVC automatically creates the correct the URL to the particular action (on a controller) that you want to perform by doing a reverse lookup in the routing table. No double page requests here, and if you change what your URLs look like you don't need to update all your links, you just change the routing table.
Master Pages
ASP.NET MVC inherits the concept of Master Pages from ASP.NET Forms. Master pages let you easily define what every page has in common, then for each page, define only what varies. It's a powerful templating technology.
Easy Communication Between Pages
Communication between pages is easy in ASP.NET MVC since it fully supports getting data from both POST and GET (URL query string parameters). It also provides a neat "TempData" store that you can place things in that will be passed on to the next page loaded, and then are automatically destroyed. This is extremely useful for passing a message onto the next page for it to display an "operation performed" message after a form submit.
JSF Advantages
As much as I dislike JSF, it does have a few things going for it that ASP.NET MVC just doesn't have.
Multi-platform Support
One of the biggest criticisms of any .NET technology is that it only runs on Windows. And while I may be a big fan of Windows, when it comes to servers, other operating systems can be viable alternatives. JSF gives you the flexibility to choose what operating system you want to run your web application on.
Multiple Implementations and Multiple Web Application Server Support
JSF is a standard, so there are many different implementations of the standard. This means that you can pick and choose which particular implementation best suits your needs (in terms of performance, etc). This encourages competition and ultimately leads to better software.
JSF can run in many different application servers, which gives you the choice of which you'd like to use. Feeling cheap? Use Glassfish, Sun's free application server. Feeling rich and in need of features? Use IBM WebSphere. Feeling the need for speed and no need for those all enterprise technologies like EJBs? Crack out Tomcat.
The Java Ecosystem
Like it or not, Java has a massive following and open-source ecosystem. If you need something, it's probably been done before and is open-source and therefore you can get it for free (probably... if you're closed-source you need to watch out for GPLed software).
Free
JSF is free, Java is free, and you can run it all on free operating systems and application servers, you can get a JSF web application up and running for nothing (excluding programming labour, of course).
ASP.NET MVC vs. JSF Advantages
So how does ASP.NET MVC weigh up against the pros of JSF? Not too well.
Only Runs on Windows
ASP.NET MVC will only run on Windows, since it runs on the .NET Framework. You could argue that Mono exists for Linux, but the Mono .NET implementation is always behind Microsoft's implementation, so you can never get the latest technology (and ASP.NET MVC is very recent).
Only Runs in One Application Server
ASP.NET MVC runs in only one application server: IIS. If IIS doesn't do what you want, or doesn't perform like you need it to, too bad, you've got no choice but to use it.
Update: A friend told me about how you can actually run ASP.NET in Apache. However, that plugin (mod_aspdot) was retired from Apache due to lack of support. Its successor, mod_mono, allows you to run ASP.NET in Apache using Mono. However, at the time of writing I see multiple tests failing on their test page. I don't know how severe these bugs are, but it's certainly not the level of support you receive from Microsoft in IIS.
Decent Ecosystem
Most people probably would have assumed I would bash the .NET ecosystem for not being very open source and that is true, up to a point. However, in recent times the .NET ecosystem has been becoming more and more open-source. ASP.NET MVC itself is open source! All this said and done, Java is still far more open-source and free than .NET.
Not Really Free
Although you can download the .NET SDK for free, you really do need to purchase Visual Studio to be effective while developing for it. You'll also need to pay for Windows on which to run your web server.
ASP.NET MVC Other Advantages
Other than all the sweet stuff I mentioned above, what else does ASP.NET MVC have to offer?
Clean Code Design
ASP.NET MVC makes it very easy to write neat, clean and well designed code because of its use of the Model View Controller pattern. JSF is supposedly MVC, but I honestly couldn't tell how they were using it. My code in JSF was horrible and awkward. ASP.NET MVC is clearly MVC and benefits a lot from it. You can unit test your controllers easily, and your processing logic is kept well away from your views.
Support for Web 2.0 Technologies
Web 2.0 is a buzzword that represents (in my mind) the use of JavaScript and AJAX to make web pages more rich and dynamic. ASP.NET makes it pretty easy to support these technologies and even comes with fully supported and documented jQuery support. JSF doesn't come with any of this stuff ready and out of the box and due to its awkward page navigation system, makes it difficult to incorporate one of the existing technologies into it. The JSF way is most definitely not the Web 2.0 way.
Visual Studio
Although you have to pay for Visual Studio, it is an excellent IDE to work with ASP.NET MVC in. NetBeans, the IDE I used JSF in, was quite possibly one of the worst IDEs I have ever used. It was awkward to use, slow, unintuitive and buggy. Visual Studio has an inbuilt, lightweight web server that you can run your web applications on while developing. You just build your application and, bam, it's already automatically running. In NetBeans, you have to deploy the application (slow!) to GlassFish and sometimes it will bollocks it up somehow and you'll just get random uncaught exceptions that a clean and build and redeploy will somehow fix. That sort of annoying, time-wasting and confusing stuff just doesn't occur in Visual Studio. You really do get what you pay for.
In conclusion, I feel that ASP.NET MVC is a far better Web Application Framework than JSF. It makes it so easy to code neat and well-designed pages that generate modern Web 2.0-style pages. JSF just ends up getting in your way. While coding ASP.NET MVC, I kept going "oh wow, that's nice!", but while developing JSF I just swore horribly. And that really tells you something.
Update: I've been told that JSF 2.0 (as yet unreleased at the time of writing) fixes many of the problems I've mentioned above. So, it might be worth a re-evaluation once it is released.
WCF Authentication at both Transport and Message Level
June 10, 2009 2:00 PM by Daniel Chambers
Let's say you've got a web service that exposes data (we could hardly say that you didn't! :D). This particular data always relates to a particular user; for example, financial transactions are always viewed from the perspective of the "user". If it's me, it's my transactions. If it's you, it's your transactions. This means every call to the web service needs to identify who the user is (or you can use a session, but let's put that idea aside for now).
However, lets also say that these calls are "on behalf" of the user and not from them directly. So we need a way of authenticating who is putting the call through on behalf of the user.
This scenario can occur in a user-centric web application, where the web application runs on its own server and talks to a business service on a separate server. The web application server talks on behalf of the user with the business server.
So wouldn't it be nice if we could do the following with the WCF service that enables the web application server to talk to the business server: authenticate the user at the message level using their username and password and authenticate the web application server at the transport level by checking its certificate to ensure that it is an expected and trusted server?
Currently in WCF the out-of-the-box bindings net.tcp and WSHttp offer authentication at either message level or the transport level, but not both. TransportWithMessageCredential security is exactly that: transport security (encryption) with credentials at the message level. So how can we authenticate at both the transport and message level then?
The answer: create a custom binding (note: I will focus on using the net.tcp binding as a base here). I found the easiest way to do this is to continue doing your configuration in the XML, but at runtime copy and slightly modify the netTcp binding from the XML configuration. There is literally one switch you need to enable. Here's the code on the service side:
ServiceHost businessHost = new ServiceHost(typeof(DHTestBusinessService));

ServiceEndpoint endpoint = businessHost.Description.Endpoints[0];

BindingElementCollection bindingElements = endpoint.Binding.CreateBindingElements();

SslStreamSecurityBindingElement sslElement = bindingElements.Find<SslStreamSecurityBindingElement>();

//Turn on client certificate validation
sslElement.RequireClientCertificate = true;

CustomBinding newBinding = new CustomBinding(bindingElements);
NetTcpBinding oldBinding = (NetTcpBinding)endpoint.Binding;
newBinding.Namespace = oldBinding.Namespace;
endpoint.Binding = newBinding;
Note that you need to run this code before you Open() on your ServiceHost.
You do exactly the same thing on the client side, except you get the ServiceEndpoint in a slightly different manner:
DHTestBusinessServiceClient client = new DHTestBusinessServiceClient();

ServiceEndpoint endpoint = client.Endpoint;

//Same code as the service goes here
You'd think that'd be it, but you'd be wrong. :) This is where it gets extra lame. You're probably attributing your concrete service methods with PrincipalPermission to restrict access based on the roles of the service user, like this:
[PrincipalPermission(SecurityAction.Demand, Role = "MyRole")]
This technique will start failing once you apply the above changes. The reason is because the user's PrimaryIdentity (which you get from OperationContext.Current.ServiceSecurityContext.PrimaryIdentity) will end up being an unknown, username-less, unauthenticated IIdentity. This is because there are actually two identities representing the user: one for the X509 certificate used to authenticate over Transport, and one for the username and password credentials used to authenticate at Message level. When I reverse engineered the WCF binaries to see why it wasn't giving me the PrimaryIdentity I found that it has an explicit line of code that causes it to return that empty IIdentity if it finds more than one IIdentity. I guess it's because it's got no way to figure out which one is the primary one.
This means using the PrincipalPermission attribute is out the window. Instead, I wrote a method to mimic its functionality that can deal with multiple IIdentities:
private void AssertPermissions(IEnumerable<string> rolesDemanded)
{
    IList<IIdentity> identities = OperationContext.Current.ServiceSecurityContext.AuthorizationContext.Properties["Identities"] as IList<IIdentity>;

    if (identities == null)
        throw new SecurityException("Unauthenticated access. No identities provided.");

    foreach (IIdentity identity in identities)
    {
        if (identity.IsAuthenticated == false)
            throw new SecurityException("Unauthenticated identity: " + identity.Name);
    }

    IIdentity usernameIdentity = identities.Where(id => id.GetType().Equals(typeof(GenericIdentity)))
                                           .SingleOrDefault();

    string[] userRoles = Roles.GetRolesForUser(usernameIdentity.Name);

    foreach (string demandedRole in rolesDemanded)
    {
        if (userRoles.Contains(demandedRole) == false)
            throw new SecurityException("Access denied: authorisation failure.");
    }
}
It's not pretty (especially the way I detect the username/password credential IIdentity), but it works! Now, at the top of your service methods you need to call it like this:
AssertPermissions(new [] {"MyRole"});
Ensure that your client is providing a client certificate to the server by setting the client certificate element in your XML config under an endpoint behaviour's client credentials section:
<clientCertificate storeLocation="LocalMachine"
                   storeName="My"
                   x509FindType="FindBySubjectDistinguishedName"
                   findValue="CN=mycertficatename"/>
Now, I mentioned earlier that the business web service should be authenticating the web application server clients using these provided certificates. You could use chain trust (see the Chain Trust and Certificate Authorities section of this page for more information) to accept any client that was signed by any of the default root authorities, but this doesn't really provide exact authentication as to who is allowed to connect. This is because any server that has a certificate that is signed by any trusted authority will authenticate fine! What you need is to create your own certificate authority and issue your own certificates to your clients (I covered this process in a previous blog titled "Using Makecert to Create Certificates for Development").
However, to get WCF to only accept clients signed by a specific authority you need to write your own certificate validator to plug into the WCF service. You do this by inheriting from the X509CertificateValidator class like this:
public class DHCertificateValidator
    : X509CertificateValidator
{
    private static readonly X509CertificateValidator ChainTrustValidator;
    private const X509RevocationMode ChainTrustRevocationMode = X509RevocationMode.NoCheck;
    private const StoreLocation AuthorityCertStoreLocation = StoreLocation.LocalMachine;
    private const StoreName AuthorityCertStoreName = StoreName.Root;
    private const string AuthorityCertThumbprint = "e12205f07ce5b101f0ae8f1da76716e545951b22";

    static DHCertificateValidator()
    {
        X509ChainPolicy policy = new X509ChainPolicy();
        policy.RevocationMode = ChainTrustRevocationMode;
        ChainTrustValidator = CreateChainTrustValidator(true, policy);
    }

    public override void Validate(X509Certificate2 certificate)
    {
        ChainTrustValidator.Validate(certificate);

        X509Store store = new X509Store(AuthorityCertStoreName, AuthorityCertStoreLocation);

        store.Open(OpenFlags.ReadOnly);
        X509Certificate2Collection certs = store.Certificates.Find(X509FindType.FindBySubjectDistinguishedName, certificate.IssuerName.Name, true);

        if (certs.Count != 1)
            throw new SecurityTokenValidationException("Cannot find the root authority certificate");

        X509Certificate2 rootAuthorityCert = certs[0];
        if (String.Compare(rootAuthorityCert.Thumbprint, AuthorityCertThumbprint, true) != 0)
            throw new SecurityTokenValidationException("Not signed by our certificate authority");

        store.Close();
    }
}
As you can see, the class re-uses the WCF chain trust mechanism to ensure that the certificate still passes chain trust requirements. But it then goes a step further and looks up the issuing certificate in the computer's certificate repository to ensure that it is the correct authority. The "correct" authority is defined by the certificate thumbprint defined as a constant at the top of the class. You can get this from any certificate by inspecting its properties. (As an improvement to this class, it might be beneficial for you to replace the constants at the top of the class with configurable options dragged from a configuration file).
To configure the WCF service to use this validator you need to set the some settings on the authentication element in your XML config under the service behaviour's service credential's client certificate section, like this:
<authentication certificateValidationMode="Custom"
                customCertificateValidatorType="DigitallyCreated.DH.Business.DHCertificateValidator, MyAssemblyName"
                trustedStoreLocation="LocalMachine"
                revocationMode="NoCheck" />
And that's it! Now you are authenticating at transport level as well as at message level using certificates and usernames and passwords!
This post was derived from my question at StackOverflow and the answer that I researched up and posted (to answer my own question). See the StackOverflow question here.
Programming to an Interface when using a WCF Service Client
June 09, 2009 3:00 PM by Daniel Chambers
Programming to an interface and not an implementation is one of the big object-oriented design principles. So, when working with a web service client auto-generated by WCF, you will want to program to the service interface rather than the client class. However, as it currently stands this is made a little awkward.
Why? Because the WCF service client class is IDisposable and therefore needs to be explicitly disposed after you've finished using it. The easiest way to do this in C# is to use a using block. A using block takes an IDisposable, and when the block is exited, either by exiting the block normally, or if you quit it early by throwing an exception or something similar, it will automatically call Dispose() on your IDisposable.
The problem lies in the fact that, although the WCF service client implements IDisposable, the service interface does not. This means you either have to cast to the concrete client type and call Dispose() or you have to manually check to see whether the service-interfaced object you posses is IDisposable and if it is then Dispose() it. That is obviously a clunky and error-prone way of doing it.
Here's the way I solved the problem. It's not totally pretty, but it's a lot better than doing the above hacks. Firstly, because you are programming to an abstract interface, you need to have a factory class that creates your concrete objects. This factory returns the concrete client object wrapped in a DisposableWrapper. DisposableWrapper is a generic class I created that aids in abstracting away whether or not the concrete class is IDisposable or not. Here's the code:
public class DisposableWrapper<T> : IDisposable
{
    private readonly T _Object;

    public DisposableWrapper(T objectToWrap)
    {
        _Object = objectToWrap;
    }

    public T Object
    {
        get { return _Object; }
    }

    public void Dispose()
    {
        IDisposable disposable = _Object as IDisposable;
        if (disposable != null)
            disposable.Dispose();
    }
}
The service client factory method that creates the service looks like this:
public static DisposableWrapper<IAuthAndAuthService> CreateAuthAndAuthService()
{
    return new DisposableWrapper<IAuthAndAuthService>(new AuthAndAuthServiceClient());
}
Then, when you use the factory method, you do this:
using (DisposableWrapper<IAuthAndAuthService> clientWrapper = ServiceClientFactory.CreateAuthAndAuthService())
{
    IAuthAndAuthService client = clientWrapper.Object;

    //Do your work with the client here
}
As you can see, the factory method returns the concrete service client wrapper in a DisposableWrapper, but exposed as the interface because it the interface type as the generic type for DisposableWrapper. You call the factory method and use its resulting DisposableWrapper inside your using block. The DisposableWrapper ensures that the object it wraps, if it is indeed IDisposable, is disposed when it itself is disposed by the using block. You can get the client object out of the wrapper, but as the service interface type and not the concrete type, which ensures you are programming to the interface and not the implementation.
All in all, it's a fairly neat way to program against a service interface, while still retaining the ability to Dispose() the service client object.
Using Makecert to Create Certificates for Development
June 09, 2009 2:00 PM by Daniel Chambers (last modified on March 22, 2010 5:35 AM)
When I first needed to use certificates to secure my WCF service, I didn't really understand how certificates worked, how to create them, and where they go. A lot of the tutorials on the web just give you a raw makecert command that you black-box and trust works to create your certificate. But do you really know what it's doing? This is what I will explain today, although not in excruciating detail. Just enough to know what's going on.
Firstly, a few concepts. Certificates are a type of identification that try to ensure that you know who you are talking to, and that it is not somebody else just impersonating the person you are expecting to be talking to. In more technical terms, a certificate binds together a name (an identity) and a public key.
But if anyone could just create their own certificates, they could declare themselves to be anyone, right? For example, I could create a certificate whose name is "google.com", but I'm not really Google. This is where Certificate Authorities step in. These organisations are able to issue certificates to people, thereby ensuring that the identity declared on the certificate is actually the identity of the person holding the certificate. For example, if I went to Thawte (or some other authority) and said I wanted a certificate for "google.com", they would tell me to get stuffed (perhaps more politely, though).
So how does this authority-issuing-thing work? A certificate authority themselves have a certificate with which they digitally sign all the certificates they issue. My computer (and pretty much everyone's) has a store of the certificates of these different certificate authorities. The computer then knows that if its sees any certificate that has been signed by one of these trusted certificate authorities' certificate, then the computer should trust that certificate. This concept is called "Chain Trust". The "chain" part refers to the "chain" of certificates-signing-certificates.
So during development, we may want to create certificates for our own purposes and then implicitly trust them. We don't really want to go to a certificate authority and get a signed certificate, because that costs money and we're cheap. Instead, what we can do is create our own certificate authority and then issue certificates to ourselves to use. We place this fake certificate authority's certificate in our computer's trusted certificate authorities store thereby causing our computer to implicitly trust all the certificates that we issue from that authority.
Note that this opens up a security hole on your PC, because if anyone was able to get a hold of your certificate authority certificate (and its private key, with which you sign certificates), they could create certificates that your computer would silently trust. Of course, this isn't too big a deal if you just slap a nice big password on your private key, and when you're finished developing, remove the fake certificate authority certificate from your trusted certificate store.
To see what certificates you currently have on your PC, open MMC (Run->mmc.exe), click "File->Add/Remove Snap-in", select Certificates from the left list, click "Add". Select "My user account", which will mean the snapin will show certificates that are stored specifically for your Windows user account. Select Certificates from the list again and "Add" it, then this time select "Computer account". This snapin will show certificates belonging to the machine specifically, and will apply across all accounts. Press Finish, then OK. I suggest you Save this MMC arrangement, so you can get back to it more easily in the future (File->Save).
Expand "Certificates (Local Computer)\Trusted Root Certification Authorities\Certificates". This folder shows you all the Certificate Authorities that your computer trusts.
So now we need to create our own Certificate Authority certificate. Open the Visual Studio Command Prompt as Administrator. CD to some place you want to store your certificate files. Here's the command for makecert to create your certificate authority, along with an explanation of each of the options you pass to makecert:
makecert -n "CN=My Awesome Certificate Authority"
         -cy authority
         -a sha1
         -sv "My Awesome Certificate Authority Private Key.pvk"
         -r
         "My Awesome Certificate Authority.cer"

  -n            : The certificate name. CN stands for Common Name and is the name that
                  identifies the certificate. For websites, this is their domain name.
  -cy authority : Creates a certificate authority certificate
  -a sha1       : Use the SHA1 algorithm
  -sv           : The private key to use, or create.
  -r            : Create a self-signed certificate (so that you are the root of the certificate chain)
  *.cer         : The filename to export to
Because you haven't created a private key before, the -sv option will create you one. Therefore, Makecert will ask you for a password that will lock the private key. Provide a nice strong one. When it then goes to use the private key, it asks you to re-provide that same password.
You can now install your new certificate authority certificate into the trusted store. To do this, simply go to your MMC console, right click on "Trusted Root Certification Authorities", go "All Tasks", then "Import". Select your new certificate, and when it asks you where to put the certificate, ensure that it goes into "Trusted Root Certification Authorities". Your computer now implicitly trusts all certificates signed by that new certificate authority.
Now we need to create a client certificate that is signed by our new certificate authority. You can do this one of two ways. The first way is to create a certificate and store it and its private key in the Windows Certificate Store (what you see in MMC). This is how you do that:
makecert -n "CN=myawesomesite.com"
         -ic "My Awesome Certificate Authority.cer"
         -iv "My Awesome Certificate Authority Private Key.pvk"
         -a sha1
         -sky exchange
         -pe
         -sr currentuser
         -ss my
         "myawesomesite.cer"

  -n            : The certificate name. CN stands for Common Name and is the name that
                  identifies the certificate. For websites, this is their domain name.
  -ic           : The certificate to use as the root authority
  -iv           : The private key of the root authority certificate
  -a sha1       : Use the SHA1 algorithm
  -sky exchange : Create a certificate that can do key exchange
  -pe           : Makes the certificate's private key exportable
  -sr           : The certificate store location to hold the certificate (currentuser or localmachine)
  -ss           : The certificate store name. my is the Personal store
  *.cer         : The filename to export to
It will ask you for the certificate authority's private key's password, so that it can use the private key to sign your certificate. It then will store your certificate (and its private key) in the current user's Personal store. You should be able to see it in MMC. It will also create a copy of the certificate on the hard drive.
The other way you can create the certificate is to create it and its private key as files on the hard drive. You can then combine them into a single PFX (Personal Information Exchange) file, which can be imported into your certificate store if you wish. To do this, run this makecert command:
makecert -n "CN=myawesomesite.com"
         -ic "My Awesome Certificate Authority.cer"
         -iv "My Awesome Certificate Authority Private Key.pvk"
         -a sha1
         -sky exchange
         -pe
         -sv "myawesomesite.com Private Key.pvk"
         "myawesomesite.com.cer"

  -n            : The certificate name. CN stands for Common Name and is the name that
                  identifies the certificate. For websites, this is their domain name.
  -ic           : The certificate to use as the root authority
  -iv           : The private key of the root authority certificate
  -a sha1       : Use the SHA1 algorithm
  -sky exchange : Create a certificate that can do key exchange
  -pe           : Makes the certificate's private key exportable
  -sv           : The private key to use, or create.
  *.cer         : The filename to export to
This will ask you for a password with which to lock the new private key you are creating for this certificate. It will also ask you for the password to the certificate authority's private key. It creates your certificate on the hard drive and also the private key in a PVK file.
To combine the private key and the certificate into a PFX file, run this command (this uses pvk2pfx):
pvk2pfx -pvk "myawesomesite.com Private Key.pvk"
        -spc "myawesomesite.cer"
        -pfx "myawesomesite.pfx"
        -pi YourPassword

  -pvk : The PVK file to lock away in the PFX
  -spc : The certificate to put in the PFX
  -pfx : The PFX file to create
  -pi : The password of the private key
This will create your PFX file, which you can import into your Personal store using MMC in a similar fashion as you did with the certificate authority certificate.
And that's it. You now have a trusted certificate authority and a certificate that is signed by that authority in your computer's store. You can now use them for development (for example, for WCF service security).
Dynamic Queries in Entity Framework using Expression Trees
June 06, 2009 2:00 PM by Daniel Chambers (last modified on January 13, 2011 12:24 PM)
Most of the queries you do in your application are probably static queries. The parameters you set on the query probably change, but the actual query itself doesn't. That's why compiled queries are so cool, because you can pre-compile and reuse a query over and over again and just vary the parameters (see my last blog for more information).
But sometimes you might need to construct a query at runtime. By this I mean not just changing the parameter values, but actually changing the query structure. A good example of this would be a filter, where, depending on what the user wants, you dynamically create a query that culls a set down to what the user is looking for. If you've only got a couple of filter options, you can probably get away with writing multiple compiled queries to cover the permutations, but it only takes a few filter options before you've got a lot of permutations and it becomes unmanageable.
A good example of this is file searching. You can filter a list of files by name, type, size, date modified, etc. The user may only want to filter by one of these filters, for example with "Awesome" as the filename. But the user may also want to filter by multiple filters, for example, "Awesome" as the filename, but modified after 2009/07/07 and more than 20MB in size. To create a static query for each permutation would result in 16 queries (4 squared)!
My first foray into creating dynamic queries is a bit less ambitious than the above example, however. I have a scenario where I need to pull out a number of Tag objects from the database by their IDs. However, the number of the Tag objects needed is determined by the user. They may select 3 Tags, or they may select 6 Tags, or they may select 4 tags; it's up to them.
The most boring approach is, of course, to get each Tag out of the database individually with its own query (the "get each Tag individually" approach):
IList<Tag> list = new List<Tag>();
foreach (int tagId in WantedTagIds)
{
    int localTagId = tagId;

    Tag theTag = (from tag in context.Tag
                  where
                    tag.Account.ID == AccountId &&
                    tag.ID == localTagId
                  select tag).First();

    list.Add(theTag);
}
You could compile that query to make it run faster, but it's still a slow operation. If the user wants to get 6 Tags, you need to query the database 6 times. Not very cool.
This is where dynamic queries can step in. If the user asks for 3 Tags, you can generate a where clause that gets all three Tags in one go; essentially: tag.ID == 10 || tag.ID == 12 || tag.ID == 14. That way you get all three Tags in one query to the database. So, I wrote some generic type-safe code to perform exactly that: generating a where clause expression from a list of IDs so that a Tag with any of those IDs is retrieved.
To understand how I did this, you need to understand how the where clause in an LINQ expression works. It is easiest to understand if you look at the method-chain form of LINQ rather than the special C# syntax. It looks like this:
IQueryable<Tag> tags = context.Tag.AsQueryable()
                                  .Where(tag => tag.ID == 10);
The Where method takes a parameter that looks like this: Expression<Func<Tag, bool>>. Notice how the Func delegate is wrapped in an Expression? This means that instead of creating an actual anonymous method for the Func delegate, the compiler will instead convert your lambda expression into an Expression Tree.
An Expression Tree is a representation of your expression in an object tree. Here is an object tree that shows the main objects in the expression tree generated by the compiler for the lambda expression in the above example's Where method:
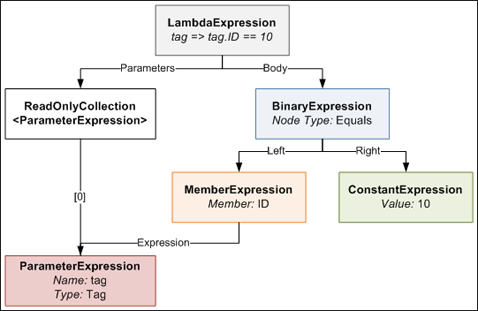
The LambdaExpression has a collection of ParameterExpressions, which are the parameters on the left side of the => symbol in the code. The actual Body of the lambda is made up of a BinaryExpression of type Equals, whose Right side is a ConstantExpression that contains the value of 10, and whose Left side is a MemberExpression. A MemberExpression represents the access of the ID property on the tag parameter.
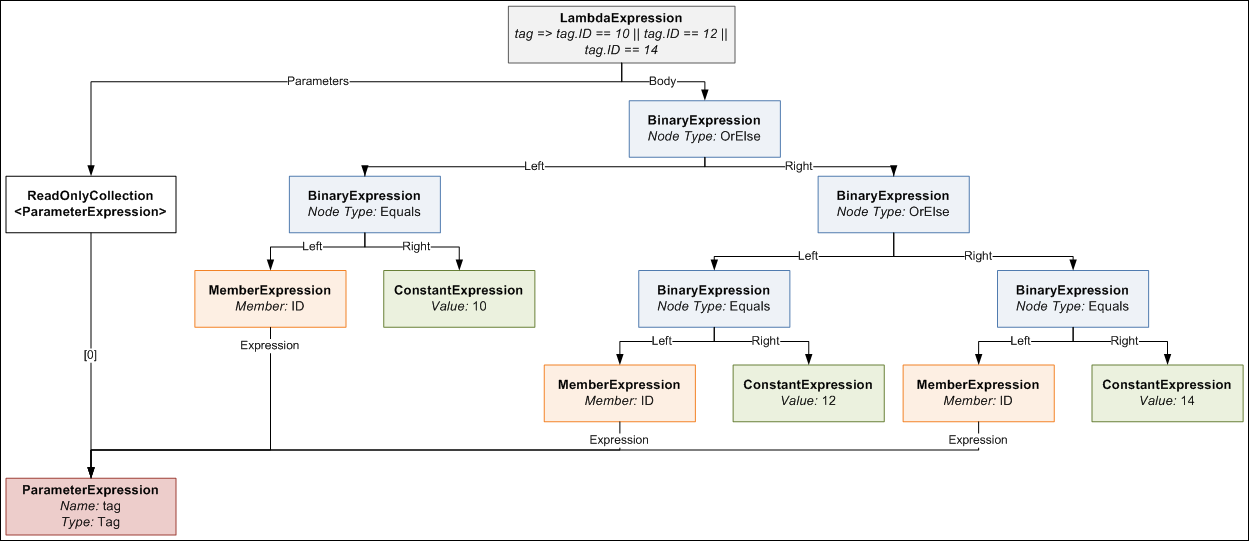
So if we wanted to represent a more complex expression such as:
tag => tag.ID == 10 || tag.ID == 12 || tag.ID == 14
this is what the expression tree would look like. It looks a bit daunting, but computers are very good at trees, so writing code to generate such a tree is not too difficult with the help of a little recursion.
I defined a special utility method that allows you to create an expression tree like the one above that results in a Where expression that accepts a particular tag so long as its ID is in a certain set of IDs. The method is generic and reusable across anywhere where you need a Where filter that gets "this value, or this value, or this value... etc". The public method looks like this:
public static Expression<Func<TValue, bool>> BuildOrExpressionTree<TValue, TCompareAgainst>(
        IEnumerable<TCompareAgainst> wantedItems,
        Expression<Func<TValue, TCompareAgainst>> convertBetweenTypes)
{
    ParameterExpression inputParam = convertBetweenTypes.Parameters[0];

    Expression binaryExpressionTree = BuildBinaryOrTree(wantedItems.GetEnumerator(), convertBetweenTypes.Body, null);

    return Expression.Lambda<Func<TValue, bool>>(binaryExpressionTree, new[] { inputParam });
}
It's stuffed full of generics which makes it look more complicated than it really is. Here's how you call it:
List<int> ids = new List<int> { 10, 12, 14 };
Expression<Func<Tag, bool>> whereClause = BuildOrExpressionTree<Tag, int>(wantedTagIds, tag => tag.ID);
As I explain how it works, I suggest you keep an eye on the last expression tree diagram. The method defines two generic types, one called TValue which represents the value you are comparing, in this case the Tag class. The other generic type is called TCompareAgainst and is the type of the value you are comparing against, in this case int (because the Tag.ID property is an int).
You pass the method an IEnumerable<TCompareAgainst>, which in our case is an IEnumerable<int>, because we have a list of IDs we are comparing against.
The second parameter ("convertBetweenTypes") can be a bit confusing; let me explain. The expression we are defining for the Where clause takes a Tag and returns a bool (hence the Func<Tag, bool> typed expression). Since the set of values we are comparing against are ints, we can't just do an == between the Tag and an int. To be able to do this comparison, we need to somehow "convert" the Tag we receive into an int for comparison. This is where the second parameter comes in. It defines an Expression that takes a Tag and returns an int (or in generic terms takes a TValue and returns a TCompareAgainst). When you write tag => tag.ID, the compiler generates an Expression Tree that contains a MemberExpression that accesses ID on the tag ParameterExpression. This means wherever we need to do a Tag == int, we instead do a Tag.ID == int by substituting the Tag.ID MemberExpression generated in the place of the Tag. Here's a diagram that explains what I'm ranting about.
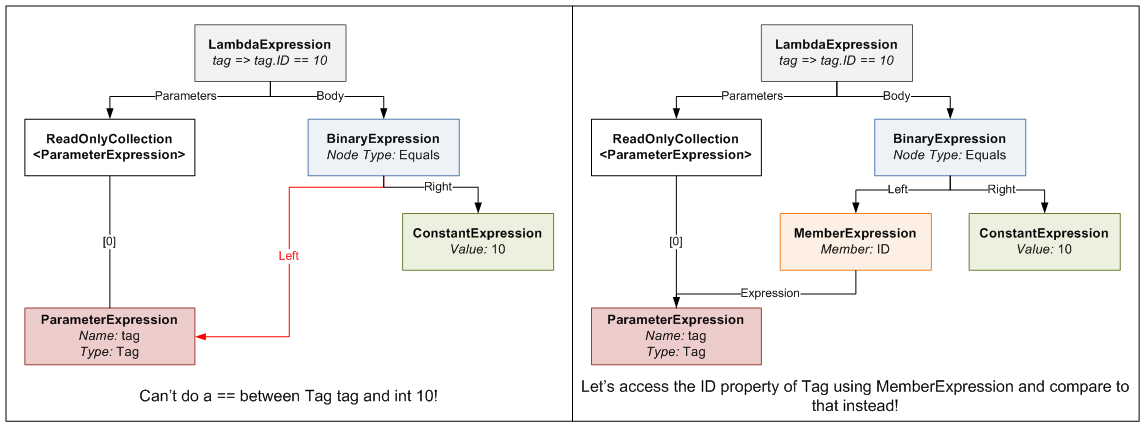
The main purpose of this method is to create the final LambdaExpression that the method returns. It does this by attaching the expression tree built by the BuildBinaryOrTree method (we'll get into this in a second) and the ParameterExpression from the convertBetweenTypes to the final LambdaExpression object.
The BuildBinaryOrTree method looks like this:
private static Expression BuildBinaryOrTree<T>(
    IEnumerator<T> itemEnumerator,
    Expression expressionToCompareTo,
    Expression expression)
{
    if (itemEnumerator.MoveNext() == false)
        return expression;

    ConstantExpression constant = Expression.Constant(itemEnumerator.Current, typeof(T));
    BinaryExpression comparison = Expression.Equal(expressionToCompareTo, constant);

    BinaryExpression newExpression;

    if (expression == null)
        newExpression = comparison;
    else
        newExpression = Expression.OrElse(expression, comparison);

    return BuildBinaryOrTree(itemEnumerator, expressionToCompareTo, newExpression);
}
It takes an IEnumerator that enumerates over the wantedItems list (from the BuildOrExpressionTree method), an expression to compare each of these wanted items to (which is the compiler-generated MemberExpression from BuildOrExpressionTreeMethod), and an expression from a previous recursion (starts off as null).
The method creates an Equals BinaryExpression that compares the expressionToCompareTo and the current itemEnumerator value. It then joins this in an OrElse BinaryExpression comparison with the expression from previous recursions. It then takes this new expression and passes it down to the next recursive call. This process continues until itemEnumerator is exhausted at which point the final expression tree is returned.
Once this returned expression tree is placed in its LambdaExpression by the BuildOrExpressionTree method, you end up with a pretty expression tree like this one shown previously. We can then use this expression tree in the where clause of a LINQ method chain query.
Here's the final "generated where clause" query in action:
using (DHEntities context = new DHEntities())
{
    int[] wantedTagIds = new[] {12, 24, 1, 4, 32, 19};

    Expression<Func<Tag, bool>> whereClause = ExpressionTreeUtil.BuildOrExpressionTree<Tag, int>(wantedTagIds, tag => tag.ID);

    IQueryable<Tag> tags = context.Tag.Where(whereClause);

    IList<Tag> list = tags.ToList();
}
So how much better is this approach, which is decidedly more complex than the simple "get each Tag at a time" approach? Is it worth the effort? I performed some benchmarks similar to the ones I did in the last blog to find out.
In one benchmark run, I ran these queries, each a hundred times, each getting out the same 6 tags:
- The "get each Tag individually" query (uncompiled)
- The "get each Tag individually" query (compiled)
- The "generated where clause" query. The where clause was regenerated each time.
I then ran the benchmark 100 times so that I could get more reliable averaged values. These are the results I got:
| Average | Standard Deviation | |
|---|---|---|
| "Get Each Tag Individually" Query Loop (Uncompiled) | 3212.2ms | 40.2ms |
| "Get Each Tag Individually" Query Loop (Compiled) | 1349.3ms | 24.2ms |
| "Generated Where Clause" Query Loop | 197.8ms | 5.3ms |
As you can see, the Generated Where Clause approach is quite a lot faster than the individual queries. We can see compiling the Individual query helps, but not enough to beat the Generated Where Clause query, which is faster even though it is recompiled each time! (You can't precompile a dynamic query, obviously). The Generated Where Clause query is 6.8 times faster than the compiled Individual query and a whopping 16.2 times faster than the uncompiled Individual query.
Even though dynamic queries are lots harder than normal static queries, because you have to manually mess with Expression Trees, there are large payoffs to be had in doing so. When used in the appropriate place, dynamic queries are faster than static queries. They could also potentially make your code cleaner, especially in the case of the filter example I talked about at the beginning of this blog. So consider getting up to speed with Expression Trees. It's worth the effort.
Making Entity Framework as Quick as a Fox
June 04, 2009 2:00 PM by Daniel Chambers
Entity Framework is the new (as of .NET 3.5 SP1) ORM technology for the .NET Framework. ORM technologies are widely accepted as the "better" way of accessing relational databases, because they allow you to work with relational data as objects in the world of objects. However, ORM tech can be slower than writing manual SQL queries yourself. This can be seen in this blog that benchmarks Entity Framework versus LINQ to SQL and a manual SQLDataReader.
Hardware is cheap (compared to programmer labour, which is not) so getting a faster machine could be an effective strategy to counter performance issues with ORM. However, what if we could squeeze some extra performance out of Entity Framework with only a little effort?
This is where Compiled Queries come in. Compiled queries are good to use where you have one particular query that you use over and over again in the same application. A normal query (using LINQ) is passed to Entity Framework as an expression tree. Entity Framework translates it into a command tree that is then translated by a database-specific provider into a query against a database. It does this every time you execute the query. Obviously, if this query is in a loop (or is called often) this is suboptimal because the query is recompiled every time, even though all that's probably changed is the parameters in the query. Compiled queries ensure that the query is only compiled once, and the only thing that varies is the parameters.
I created a quick benchmark app to find out just how much faster compiled queries are against normal queries. I'll illustrate how the benchmark works and then present the results.
Basically, I had a particular non-compiled LINQ to Entities query which I ran 100 times in a loop and timed how long it took. I then created the same query, but as a compiled query instead. I ran it once, because the query is compiled the first time you run it, not when you construct it. I then ran it 100 times in a loop and timed how long it took. Also, before doing any of the above, I ran the non-compiled query once, because it seemed to take a long time for the very first operation using the Entity Framework to run, so I wanted that time excluded from my results.
The non-compiled query I ran looked like this:
IQueryable<Transaction> transactions =
                from transaction in context.Transaction
                where
                  transaction.TransactionDate >= FromDate &&
                  transaction.TransactionDate <= ToDate
                select transaction;

List<Transaction> list = transactions.ToList();
As you can see, it's nothing fancy, just a simple query with a small where clause. This query returns 39 Transaction objects from my database (SQL Server 2005).
The compiled query was created like this:
Func<DHEntities, DateTime, DateTime, IQueryable<Transaction>>
    query;

query = CompiledQuery.Compile(
            (DHEntities ctx, DateTime fromD, DateTime toD) =>
                from transaction in ctx.Transaction
                where
                  transaction.TransactionDate >= fromD &&
                  transaction.TransactionDate <= toD
                select transaction);
As you can see, to create a compiled query you pass your LINQ query to CompiledQuery.Compile() via a lambda expression that defines the things that the query needs (ie the Object Context (in this case, DHEntities) and the parameters used (in this case two DateTimes). The Compile function will return a Func delegate that has the types you defined in your lambda, plus one extra: the return type of the query (in this case IQueryable<Transaction>).
The compiled query was executed like this:
IQueryable<Transaction> transactions = query.Invoke(context, FromDate, ToDate);

List<Transaction> list = transactions.ToList();
I ran the benchmark 100 times, collected all the data and then averaged the results:
| Average | Standard Deviation | |
|---|---|---|
| Non-compiled Query Loop | 534.1ms | 20.6ms |
| Compiled Query Loop | 63.1ms | 0.6ms |
The results are impressive. In this case, compiled queries are 8.5 times faster than normal queries! I've showed the standard deviation so that you can see that the results didn't fluctuate much between each benchmark run.
The use case I have for using compiled queries is doing database access in a WCF service. I expose a service that will likely be beaten to death by constant queries from an ASP.NET MVC webserver. Sure, I could get larger hardware to make the WCF service go faster, or I could simply get a rather massive performance boost just by using compiled queries.
Sexy C# Filter Code for RealDWG Database Navigation
May 31, 2009 2:00 PM by Daniel Chambers
I've been having to use RealDWG for my part time programming work at Onset to programmatically read DWG files (AutoCAD drawing files). I've been finding RealDWG a pain to learn, as AutoDesk's documentation seems to assume you're an in-house AutoCAD programmer, so they blast you with all these low level file access details like BlockTables and SymbolTables. However, this isn't surprising, since I believe AutoDesk eat their own dog food and use the same API internally. That doesn't make it any easier to learn and use, though.
RealDWG (or ObjectARX, which is the underlying API that is wrapped with .NET wrapper classes) reads a DWG file into an internal "database". Everything is basically an ObjectId, which is a short stub object that you give to a Transaction object that will get you the actual real object. Objects are nested inside objects, which are nested inside more objects, and none of it typesafe, as Transaction returns objects as their top level DBObject class. So you're constantly casting to the actual concrete type you want. Casting all over the place == bad.
Anyway, I found that navigating around a RealDWG object graph was a pain. For example, to find BlockTableRecords (which are inside a BlockTable) that contain AttributeDefinitions (don't worry about what those are; it's not important) you need to do something like this:
BlockTable blockTable = (BlockTable)transaction.GetObject(db.BlockTableId, OpenMode.ForRead);

foreach (ObjectId objectId in blockTable)
{
    DBObject dbObject = transaction.GetObject(objectId, OpenMode.ForRead);

    BlockTableRecord record = (BlockTableRecord)dbObject;

    if (record.HasAttributeDefinitions == false)
        continue;

    //Do what you need to here...
}
That's really verbose and messy, with a lot of code just dedicated to opening objects and casting them, and filtering. It was annoying me, so I refactored it and wrote the following sexy method that uses generics with delegates to clean that right up:
private IEnumerable<T> Filter<T>(Predicate<T> predicate, IEnumerable realDwgEnumerable, Transaction transaction)
    where T : class
{
    foreach (ObjectId obj in realDwgEnumerable)
    {
        DBObject dbObject = transaction.GetObject(obj, OpenMode.ForRead);

        T genericObj = dbObject as T;
        if (genericObj == null)
            continue;

        if (predicate != null && predicate(genericObj) == false)
            continue;

        yield return genericObj;
    }
}
The method is generic and takes an IEnumerable (which is the non-generic interface that all the RealDWG stuff that you can iterate over implements) and a Transaction (to open objects from ObjectId stubs with). Additionally, it takes a Predicate<T> that allows you to specify a condition on which concrete objects are included in the final set. It returns an IEnumerable of the generic type T.
What the method will do is iterate over the IEnumerable and pull out all the objects that match the generic type that you define when you call the method. Additionally, it will return only those objects that match your predicate. The method uses the yield return keywords to lazy return results as the returned IEnumerable is iterated over.
Here's the above messy example all sexed up by using this method:
BlockTable blockTable = (BlockTable)transaction.GetObject(db.BlockTableId, OpenMode.ForRead);

IEnumerable<BlockTableRecord> blockTableRecords = Filter<BlockTableRecord>(btr => btr.HasAttributeDefinitions, blockTable, transaction);

foreach (BlockTableRecord blockTableRecord in blockTableRecords)
{
    //Do what you need to here...
}
Just like using LINQ, the above snippet (which looks longer than it really is thanks to wrapping) simply declares that it wants all BlockTableRecords in the BlockTable that have attribute definitions (using a lambda expression). It's much neater, if only because it shifts the filtering code out of the way into the Filter method, so that it doesn't clutter up what I'm trying to do. It also makes the foreach type-safe, because now we're iterating over an IEnumerable<T> rather than a non-generic IEnumerable. Worst case: the IEnumerable<T> is empty. No InvalidCastExceptions here.
Another place where this method is awesome is when you've got lots of different typed objects getting returned as you iterate over the RealDWG IEnumerable object, which happens a lot. Using this method you can very simply get the type of object you're looking for by doing this:
IEnumerable<TypeIWant> objectsIWant = Filter<TypeIWant>(null, blockTableRecord, transaction);
Optimally you use the overload that doesn't include the Predicate<T> as a parameter, instead of passing null as the predicate (the overload passes null for you). I didn't show that here, but it's in my code.
Wrapping up, this again confirms how much I love C# 3.0 (and soon 4.0!). All the new language features let you do some simply awesome things that you just can't do in aging languages like Java (Java doesn't even have delegates, let alone lambda expressions!).
Variable Capture in C# with Anonymous Delegates
April 06, 2009 2:00 PM by Daniel Chambers
Anonymous delegates (or, if you're using C# 3.0, lambda expressions) seem fairly simple at first sight. It's just a class-less method that you can pass around and call at will. However, there are some intricacies that aren’t apparent unless you look deeper. In particular, what happens if you use a variable from outside the anonymous delegate inside the delegate? What happens when that variable goes out of scope (say it’s a local variable and the method that contained it returned)?
I’ll run through some small examples that will explain something called “variable capture” and how it relates to anonymous delegates (and therefore, lambda expressions).
The code below for loops and adds a new lambda that returns the index variable from the for loop. After the loop has concluded, all the lambdas created are run and their results written to the console. FYI, Func<TResult> is a .NET built-in delegate that takes no parameters and returns TResult.
List<Func<int>> funcs = new List<Func<int>>();
for (int j = 0; j < 10; j++)
    funcs.Add(()  => j);
foreach (Func<int> func in funcs)
    Console.WriteLine(func());
What will be outputted on the console when this code is run? The answer is ten 10s. Why is this? Because of variable capture. Each lambda has “captured” the variable j, and in essence, extended its scope to outside the for loop. Normally j would be thrown away at the end of the for loop. But because it has been captured, the delegates hold a reference to it. So its final value, after the loop has completed, is 10 and that’s why 10 has been outputted 10 times. (Also, j won’t be garbage collected until the lambda is, since it holds a reference to j.)
In this next example, I’ve added one line of seemingly redundant code, which assigns the j index variable to a temporary variable inside the loop body. The lambda then uses tempJ instead of j. This makes a massive difference to the final output!
List<Func<int>> funcs = new List<Func<int>>();
for (int j = 0; j < 10; j++)
{
    int tempJ = j;
    funcs.Add(() => tempJ);
}
foreach (Func<int> func in funcs)
    Console.WriteLine(func());
This piece of code outputs 0-9 on the console. So why is this so different to the last example? Whereas j’s scope is over the whole for loop (it is the same variable across all loop iterations), tempJ is a new tempJ for every time the loop is run. This means that when the lambdas capture tempJ, they each capture a different tempJ that contains what j was for that particular iteration of the loop.
In this final example, the lambda is created and evaluated within the for loop (and no longer uses tempJ).
for (int j = 0; j < 10; j++)
{
    Func<int> func1 = () => j;
    Console.WriteLine(func1());
}
This code is similar to the first example; the lambdas capture j whose scope is over the whole for loop. However, unlike the first example, this outputs 0-9 on the console. Why? Because the lambda is executed inside each iteration. So at the point at which each lambda is executed j is 0-9, unlike the first example where the lambdas weren’t executed until j was 10.
In conclusion, using these small examples I’ve shown the implications of variable capture. Variable capture happens when an anonymous delegate uses a variable from the scope outside of itself. This causes the delegate to “capture” the variable (ie hold a reference to it) and therefore the variable will not be garbage collected until the capturer delegate itself is garbage collected.
Value Type Boxing in C#
March 12, 2009 2:00 PM by Daniel Chambers
There are times when I am surprised because I come across some basic principle or feature in a programming language that I just didn't know about but really should have (see the "Generics and Type-Safety" blog for an example). The most recent example of this was in my Enterprise .NET lecture where they asked us to define what boxing and unboxing was. I'd heard of it in relation to Java, because Java has non-object value types that need to be converted to objects sometimes (the process of "boxing") so they can be used with Java's crappy generics system. But since, in C#, even an int is an object with methods, I assumed that boxing and unboxing was not done in C#.
I was wrong. C# indeed does boxing and unboxing! At first, this didn't make sense. My incomplete understanding of boxing (in relation to Java) was that value types were stored only on the stack (yes, this is a little inaccurate) and when you needed to put them on the heap, you had to box them. In C#, I thought everything was an object, so this process would have been redundant.
Wrong. .NET (and therefore C#) has value types, which are boxed and unboxed transparently by the CLR. Value types in C# derive from the ValueType class which itself derives from Object. Structs in C# are automatically derived from ValueType for you (therefore you cannot do inheritance with structs). Unlike in Java, value types are still objects: they can have methods, fields, properties, events, etc.
Why are value types good? When .NET deals with a value type, it stores the object's data inline in memory. This means when the variable is on the stack, the data is stored directly in stack-space. When the variable is inside a heap object, the data is stored directly inside the heap object. This is different to reference types, where instead of the data being stored inline, a pointer to the data which is somewhere on the heap is stored inline. This means it takes longer to access a reference type than a value type as you have to read the pointer, then read the location the pointer points to.
Boxing kills this performance increase you get when you use value types. When you box (or more accurately, the CLR boxes) a value type, it essentially wraps it in a reference type object that is stored on the heap and then uses a reference to point to it. Your value type is now a reference type. So not only do you need to look up a reference to get to the final data, you have to spend time creating the wrapper object at runtime.
When does boxing happen? The main place to watch out for is when you pass a value type around as Object. A common place this might happen is if you use ArrayList. If you do, it's time to move on. :) .NET 2.0 introduced generics and you should use them. Generics play nice with value types, so try using a List<T> instead.
So what do I mean when I say "generics play nice with value types"? Unlike Java, whose generics system sucks (it does type erasure, which is half-arsed generics), .NET understands generics at runtime. This means when you define, for example, a List<int>, .NET realises that int is a value type and then will allocate ints inline inside the List as per the "inline storage" explanation above. This is lots better than Java or ArrayList's behaviour, where each element in the array is a pointer to a location on the heap and because the value type that had been added has been boxed.
In hindsight, especially when I think about it all from a C++ perspective, I should have known C# did value type boxing. How could it have value types and not? But I guess I just didn't join the dots.
Sleep Display
November 01, 2008 2:00 PM by Daniel Chambers
I've always had a problem when I've left my computer on at night. My screens, the two 24" beasts that they are, light up my room like its 12 o'clock midday. It makes it rather difficult to get to sleep. My solution, in the past, was to temporarily change my Windows power configuration so that my monitor would sleep itself after one minute of inactivity. A clunky and annoying solution, to be sure.
This weekend, I'd had enough. I searched around on the net for a program that would allow me to sleep my displays immediately, without the need for dicking around in power configuration settings.
Sure enough, this bloke has a program that'll do just that. However, he expects to be paid twenty whole dollars for it. I choked when I saw that; turning off your screens cannot be so hard as to require a 20 dollar (US dollars as well!) payment for it. So I did some more searching. Sure enough, its quite literally one method call to send your displays to sleep.
So I whipped up a program to do it: Sleep Display. I won't repeat here what I've already written on its webpage, so pop on over there to read up on it.
For those interested, here is how you sleep your monitors in C# (note this is not actually a class from Sleep Display, I've cut out loads of code to just get it down to the bare essentials):
using System;
using System.Runtime.InteropServices;
using System.Threading;
using System.Windows.Forms;

namespace DigitallyCreated.SleepDisplay
{
    public class Sleeper
    {
        //From WinUser.h
        private const int WM_SYSCOMMAND = 0x0112;
        private const int SC_MONITORPOWER = 0xF170;
        //Not from WinUser.h (from MSDN doco about
        //SC_MONITORPOWER)
        private const int SC_MONITORPOWER_SHUTOFF = 2;

        public void SleepDisplay()
        {
            Form form = new Form();
            DefWindowProcA((int)form.Handle, WM_SYSCOMMAND,
                SC_MONITORPOWER, SC_MONITORPOWER_SHUTOFF);
        }

        [DllImport("user32", EntryPoint = "DefWindowProc")]
        public static extern int DefWindowProcA(int hwnd,
            int wMsg, int wParam, int lParam);
    }
}
Basically, all you're doing is sending a Windows message to the default window message handler by calling a Win32 API. The message simply tells Windows to sleep the monitor. Note the use of DllImport and public static extern. This is basically where you map a call to a native (probably C or C++) function into C#. C# will handle the loading of the DLL and the marshalling and the actual calling of the function for you. It's pretty nice.
The Form is needed because DefWindowProc requires a handle to a window and the easiest way I knew how to get one of those was to simply create a Form and get its Handle. DefWindowProc has its doco on MSDN here and the doco for the types of WM_SYSCOMMAND message you can send is here.
As you can see, the process is not rocket-science, nor is it worth 20 whole bucks. In fact, the installer I created was more of a pain than the app itself. I decided to try and use Windows Installer instead of NSIS. I used Windows Installer XML (WiX) which seems to be an open-source project from Microsoft that allows you to create Windows Installer packages and UIs by writing XML. It's also got a plugin for Visual Studio.
WiX is... alright. It's a real bitch to work with, simply because I'm nowhere near a Windows Installer pro so I don't really understand what's going on. Windows Installer is massive and I only scratched the surface of it when doing the installer for Sleep Display. The problem with WiX, really, is that it has a massive learning curve. If you're interested in learning more about WiX, I suggest you grab v3.0 (Beta) and install it, then go check out the (huge) tutorial they've got here. Then prepare to go to bed at 6.30AM after hours of pain like I did. :)